
この記事で解決できる悩み
- 記事内の内部リンクをテキストリンクからブログカードに変更したい。
- プラグインを利用すると競合と同じデザインになってしまうため、cssを利用してオリジナルのデザインを実装したい。
この記事では、
cssとfunction.phpを編集して、オリジナルのブログカードを実装できるように、それぞれのソースコードを紹介しています。
コピペで誰でもすぐに実装できるようになっているので、是非利用してみてください。
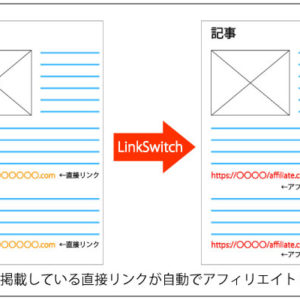
コピペで実装できるブログカードのデザインイメージ
下記で利用するソースコードを利用することで、以下のようなデザインのブログカードを実装することができます。
cssの記述内容
cssは、ブログカードのデザイン・レイアウトを指定します。
カスタマイズして、オリジナルのデザインを実装したい場合は、このcssファイルを編集して行うようにしてください。
/*-------------------------
ブログカード
-------------------------*/
.blog-card {
border:1px solid #b1b1b1;
word-wrap:break-word;
margin-right: 15px;
margin-top: 10px;
margin-bottom: 10px;
/* sp用 ※4 */
}

.blog-card-area {
display: -webkit-flexbox;
display: -ms-flexbox;
display: flex;
flex-wrap: nowrap;
justify-content: space-between;
margin-right:10px;
}

.blog-card a {
text-decoration: none;
}

.blog-card:hover {
opacity: 0.8;
}

.blog-card-title {
color: #337ab7;
display: block;
}
.blog-card-thumbnail {
flex-basis: 25%;
padding:10px;
}
.blog-card-thumbnail img {
padding: 0;
-webkit-transition: 0.3s ease-in-out;
-moz-transition: 0.3s ease-in-out;
-o-transition: 0.3s ease-in-out;
transition: 0.3s ease-in-out;
}
.blog-card-content {
flex-basis: 73%;
display: flex;
flex-direction: column;
justify-content: space-between;
line-height:120%;
}

.blog-card-textarea {
display: flex;
flex-direction: column;
}

.blog-card-title {
padding:10px 10px 10px 0;
font-size:1em;
font-weight: bold;
line-height: 1.5em;
}
.blog-card-excerpt {
font-size:0.75em;
color:#333;
margin:0 5px 5px;
line-height: 1.3em;
}
.blog-card-next {
text-align:right;
margin-right:10px;
margin-bottom: 20px;
}
.blog-card-next:after {
background: #55acee;
color: white;
padding:5px 15px 5px 15px;
content: "続きを読む" ;
font-size:0.9em;
border-radius: 3px;
}

/* レスポンシブ対応 */
@media screen and (max-width: 640px) {
.blog-card-title {
padding:10px 10px 10px 0;
font-size:0.9em;
font-weight: bold;
line-height: 1.3em;
}
.blog-card-excerpt {
display:none;
}
}
function.phpの記述内容
cssでは、主にデザイン・レイアウトに関しての記述を行いましたが、
function.phpでは、記事の画像や説明文の取得等のシステム的な記述を行います。
function.phpに文法的な誤りがあると、WordPressサイト全体がエラーで表示できなくなる等の不具合が生じるため、コピペで使用する場合はコピーの選択範囲に間違いがないように注意してください。
//ブログカード
// 記事IDを指定して抜粋文を取得する
function ltl_get_the_excerpt($post_id){
  global $post;
  $post_bu = $post;
  $post = get_post($post_id);
  setup_postdata($post_id);
  $output = get_the_excerpt();
  $post = $post_bu;
  return $output;
}

//サイト内リンクをブログカードに変換するショートコード
function nlink_scode($atts) {
	extract(shortcode_atts(array(
		'url'=>"",
		'title'=>"",
		'excerpt'=>""
	),$atts));

	$id = url_to_postid($url);//URLから投稿IDを取得

	$img_width ="160";//画像サイズの幅指定
	$img_height = "160";//画像サイズの高さ指定
	$no_image = 'http://xn--ockl7gh3i3b.com/wp-content/uploads/2016/07/8206ef08e3589c9361e6a7c8e637f208-1.png';//アイキャッチ画像がない場合の画像を指定

	//タイトルを取得
	if(empty($title)){
		$title = esc_html(get_the_title($id));
	}
    //抜粋文を取得
	if(empty($excerpt)){
		$excerpt = esc_html(ltl_get_the_excerpt($id));
	}

    //アイキャッチ画像を取得
    if(has_post_thumbnail($id)) {
        $img = wp_get_attachment_image_src(get_post_thumbnail_id($id),array($img_width,$img_height));
        $img_tag = "<img src='" . $img[0] . "' alt='{$title}' width=" . $img[1] . " height=" . $img[2] . " />";
    }else{
    $img_tag ='<img src="'.$no_image.'" alt="" width="'.$img_width.'" height="'.$img_height.'" />';
    }

	$nlink .='
  <div class="blog-card">
    <a href="'. $url .'">
    <div class="blog-card-area">
      <div class="blog-card-thumbnail">'. $img_tag .'</div>
      <div class="blog-card-content">
          <div class="blog-card-textarea">
          <div class="blog-card-title">'. $title .' </div>
          <div class="blog-card-excerpt">'. $excerpt .'</div>
          </div>
          <div class="blog-card-next"></div>
      </div>
      </div>
      </a>
  </div>';

	return $nlink;
}

add_shortcode("nlink", "nlink_scode");
// END
// サイト内リンクをブログカードに変換するショートコード
//---------------------------------------//
以上で、ブログカードのカスタマイズは完了です。
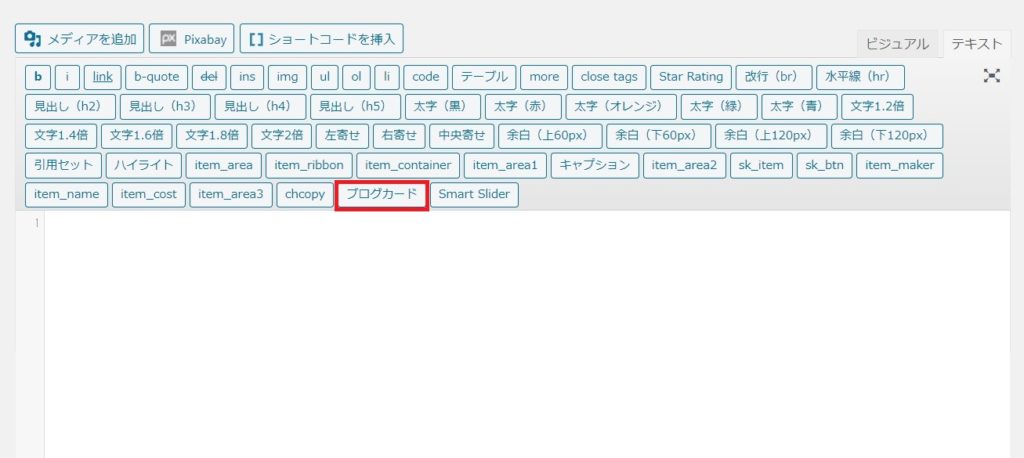
ブログカードをショートコードに登録する
また、上記のショートコードを登録すれば、ボタン一つでブログカードを挿入できるようになるため、大変便利です。
具体的には、プラグイン「AddQuicktag」を利用して、以下のように登録を行います。

すると記事編集ページで、以下のようなショートコードが表示されるようになります。
まとめ
コピペで出来るブログカードの実装方法について、ソースコードから便利な使い方まで紹介してきましたがいかがだったでしょうか?
適切な内部リンクの配置は、SEO的にも非常に重要な部分です。
この機会にぜひ実装し、読み手に取って使いやすい記事づくりに役立ててください。
この記事の執筆者